If you know how to stain wood your projects will have a professional finish
If you are like me, home improvement projects are not exactly your forte. While some tasks like
hanging dry wall and running electrical wire can take years of training and practice to master, some
require little or no training at all. Staining wood projects is one of those that even the novice can accomplish with aplomb, especially if they follow these general instructions on how to make that unfinished piece of wood furniture or wood crafting project really stand out.
Staining wood is a good place to start because it simple and most mistakes be easily fixed by applying paint thinner to remove the stain.
Here are a few steps to make that piece of wood furniture really shine:
Sand the Wood to a Consistent Smoothness
Generally, the first step to staining a piece of wood is applying sand paper until the wood has reached a uniform smoothness. Different types of wood require different grit-levels of sand paper, so be sure to consult with the professionals at your local hardware store.
~
Also, be sure to fill in any low spots, divots, cracks, nail holes or other imperfections before sanding to ensure a totally smooth surface.
Know Your Stain
Once the wood has been sanded and cleaned it is time to select a stain. If the wood you are working with is a ?soft? wood such as fir or pine then it is imperative that you use a wood conditioner to avoid blotchiness or uneven drying.
As for the stains themselves the main distinction between them is in the color they produce. Use oil-based stains to bring out the natural tone of the wood. If you want a smooth, even lighter color use a water-based stain. Use can also choose from a wide variety of pigment and dye infused stains for a particular shade or color.
Also, be sure to test the stain on a piece of scrap wood to ensure you like the shade.
Safety First
When applying stain always be sure to wear the appropriate safety gear. This includes gloves, eye protection and a face mask that provides air filtration. Most stains and the fumes they produce can be irritating and harmful to the skin, eyes and lungs. They can also cause you to lose consciousness, so be sure to apply the stain in a well-ventilated area.
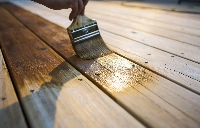
Apply the Stain
Once the wood is ready and treated as necessary and all necessary safety precautions are in order, it is time to apply your stain. Use a clean rag, paintbrush or sponge brush to apply generous
amounts of the stain to the wood. Be sure that you are doing this in large, continuous, sweeping
motions to apply the stain as evenly as possible.
Let the stain absorb for about fifteen minutes and re-apply coats of stain as needed until you are satisfied with the result. Once this is done, let it dry in a cool, clean place for about ten hours. You might also want to consider a coat or two of polyurethane for protective purposes. This is simply applied and left to dry for a few hours.
Once you have completed these easy steps you can bring your newly stained piece of wood furniture inside and brag loudly of your home improvement prowess.
Keep in mind of course that these are just general instructions and every project tends to present its own unique challenges. You can usually find assistance in the home improvement section of your local hardware store.